SmartSSD Installation Guide

Table of Contents
Relative Posts #
- Overview
- Introduction to SmartSSD
- Installation and Environment Setup(This Post)
- Design of Streaming Sampler
- Design of Random read sampler
Important links #
Xilinx SmartSSD Installation and User Guide [PDF]
Xilinx code samples [GitHub]
SmartSSD Env #
To run a SmartSSD program, you need:
- XRT- Xilinx® runtime (XRT) – Required for running an application using SmartSSD.
To develope a SmartSSD program(compile), in addition to XRT, you need:
Development Target Platform – Required for developing a SmartSSD application.
Vitis – Required for compiling the SmartSSD program.
Vitis is a large and difficult-to-use IDE; however, you do not need to launch it. You only need the toolchain it contains. More specificlly, you need v++ tool. It is a command line tool that can use to create a vitis/vivado project and compile your code using theses tools.
XRT Setup #
About OS version #
To save time, simply install XRT on Ubuntu 20.04 (the latest one is okay; we are running 20.04.6). Do not attempt to run it on any OS that the SmartSSD version of XRT does not explicitly support.
The link below listed all the OS versions that XRT 2021.2 supports. The OS version must exactly match the list. During the installation process, XRT will attempt to compile a kernel module. If the kernel/kernel-headers/kernel-devel version is not one from the supported list, the compilation will fail.
Although the latest version of XRT on GitHub indicates support for new OS versions, we have not tested whether it still includes SmartSSD support. Since the SmartSSD software download page only provides XRT 2021.2, we assume this is the only version that supports SmartSSD.
Below is the record of the OS versions we have tried.
| OS | Kernel Version | Result | Comment |
|---|---|---|---|
| Ubuntu 20.04.6 | 5.4.0-164-generic | Succeed | |
| Rocky 9.2 | 5.14.0-284.11.1 | Failed | XRT kernel module compile failed |
| RHEL 9.2 | 5.14.0-284.11.1 | Failed | XRT kernel module compile failed |
| Rocky 8.8 | 4.18.0-477.10.1 | Failed | XRT kernel module compile failed |
| Rocky 8.4 | 4.18.0-305 | Failed | Rocky will automatically install latest kernel header 477 |
| RHEL 8.4 | 4.18.0-305 | Succeed | Tried on VM, not sure really work |
| Rocky 8.8 | 4.18.0-305 | Failed | IT manually downgrade the kernel and other component to 4.18.0-305, caused too many problem |
| Ubuntu 20.04.6 | 5.4.0-164-generic | Succeed |
If you are installing OS with BU’s server #
- Navigate to https://cs-kvm2.bu.edu/ and access the KVM.
- Mount the Ubuntu 20.04 ISO https://releases.ubuntu.com/20.04.6/ubuntu-20.04.6-live-server-amd64.iso
- Boot from the image. Note that entering the installer may take some time as the machine remotely reads the ISO from your machine. This step takes about 1.5 hours, with no progress bar. Just wait and do not touch anything. Alternatively, you can ask the professor Vasia for physical access to the server.
- After installation, if you encounter a purple screen where typing is unresponsive, try pressing Alt+F1 (or Option+F1 on Mac). This should switch the view to the terminal.
Install XRT #
Download XRT from
https://www.xilinx.com/support/download/index.html/content/xilinx/en/downloadNav/alveo/smartssd.html
Install it
sudo apt install ./xrt*.deb
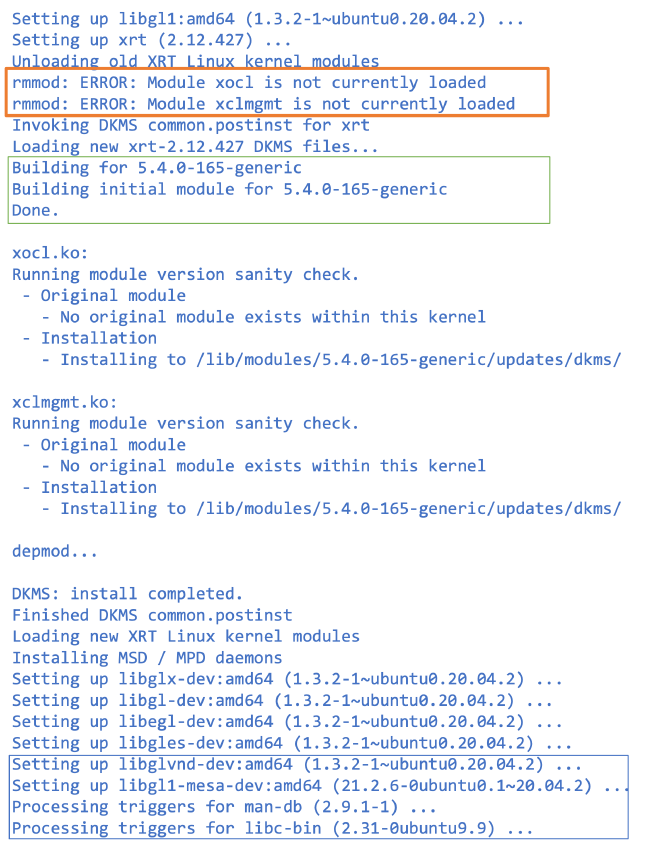
And here is a screenshot of the installazation process.

In the RED box, errors may appear.
This is expected. The installer tries to stop the old XRT module, which does not exist.
In the green box, the installer attempts to build the kernel module.
If this process fails, the log path will be displayed.
- If nothing appears in the log path, it likely indicates that the build did not occur, probably due to the absence or mismatch of kernel headers and kernel-devel packages. (CentOS problem)
- If the log mentions C grammar errors, it is probably because the kernel version is not supported.
In the blue box, regardless of whether the compilation is successful or not, you will always see
xrt installed successfullyin the package manager.The failure of the XRT kernel module compilation is a silent fail. Refer to the details above to check the compilation status
Install Development Target Platform #
Download from
https://www.xilinx.com/support/download/index.html/content/xilinx/en/downloadNav/alveo/smartssd.html
Install by
sudo apt install ./xilinx-u2-gen3x4-xdma-gc-2-202110-1-dev*.deb
sudo apt install ./xilinx-u2-gen3x4-xdma-gc-validate_2*.deb
sudo apt install ./xilinx-u2-gen3x4-xdma-gc-base_2*.deb
And you will see the result looks like
yuhangs@casper:~$ sudo apt install ./xilinx-u2-gen3x4-xdma-gc-validate_2*.deb
Reading package lists... Done
Building dependency tree
Reading state information... Done
Note, selecting 'xilinx-u2-gen3x4-xdma-gc-validate' instead of './xilinx-u2-gen3x4-xdma-gc-validate_2-3311104_all.deb'
The following NEW packages will be installed:
xilinx-u2-gen3x4-xdma-gc-validate
0 upgraded, 1 newly installed, 0 to remove and 48 not upgraded.
Need to get 0 B/8,012 kB of archives.
After this operation, 0 B of additional disk space will be used.
Get:1 /home/yuhangs/xilinx-u2-gen3x4-xdma-gc-validate_2-3311104_all.deb xilinx-u2-gen3x4-xdma-gc-validate all 2-3311104 [8,012 kB]
Selecting previously unselected package xilinx-u2-gen3x4-xdma-gc-validate.
(Reading database ... 80215 files and directories currently installed.)
Preparing to unpack .../xilinx-u2-gen3x4-xdma-gc-validate_2-3311104_all.deb ...
Unpacking xilinx-u2-gen3x4-xdma-gc-validate (2-3311104) ...
Setting up xilinx-u2-gen3x4-xdma-gc-validate (2-3311104) ...
yuhangs@casper:~$ sudo apt install ./xilinx-u2-gen3x4-xdma-gc-base_2*.deb
Reading package lists... Done
Building dependency tree
Reading state information... Done
Note, selecting 'xilinx-u2-gen3x4-xdma-gc-base' instead of './xilinx-u2-gen3x4-xdma-gc-base_2-3311104_all.deb'
The following NEW packages will be installed:
xilinx-u2-gen3x4-xdma-gc-base
0 upgraded, 1 newly installed, 0 to remove and 48 not upgraded.
Need to get 0 B/7,243 kB of archives.
After this operation, 0 B of additional disk space will be used.
Get:1 /home/yuhangs/xilinx-u2-gen3x4-xdma-gc-base_2-3311104_all.deb xilinx-u2-gen3x4-xdma-gc-base all 2-3311104 [7,243 kB]
Selecting previously unselected package xilinx-u2-gen3x4-xdma-gc-base.
(Reading database ... 80226 files and directories currently installed.)
Preparing to unpack .../xilinx-u2-gen3x4-xdma-gc-base_2-3311104_all.deb ...
Unpacking xilinx-u2-gen3x4-xdma-gc-base (2-3311104) ...
Setting up xilinx-u2-gen3x4-xdma-gc-base (2-3311104) ...
Partition package installed successfully.
Please flash card manually by running below command:
sudo /opt/xilinx/xrt/bin/xbmgmt program --base --device
To find , run this command:
sudo /opt/xilinx/xrt/bin/xbmgmt examine
Flash the SmartSSD with current IDE platform #
When we get the SmartSSD, it may come with a platform version lower than the one installed on your machine. To ensure compatibility and optimal performance, you will need to upgrade the internal firmware of the SmartSSD.
sudo /opt/xilinx/xrt/bin/xbmgmt program --base --image /opt/xilinx/firmware/u2/gen3x4-xdma-gc/base/partition.xsabin /opt/xilinx/firmware/u2/gen3x4-xdma-gc/base/partition.xsabin --flash-type spi --device <xclmgmt BDF>
- See SmartSSD Doc Page 13 for details
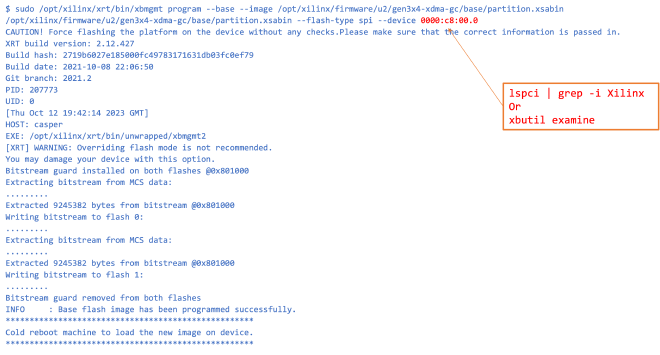
<xclmgmt BDF>can be retrieved using:lspci | grep -i Xilinx, It looks like0000:cc:00.0- Don’t worry if you type in the wrong device address. It will display the current flashable device for you.
- Perform a cold reboot (not the “reboot” command). This requires physically cutting off the power, so that the SmartSSD can boot into the new image.
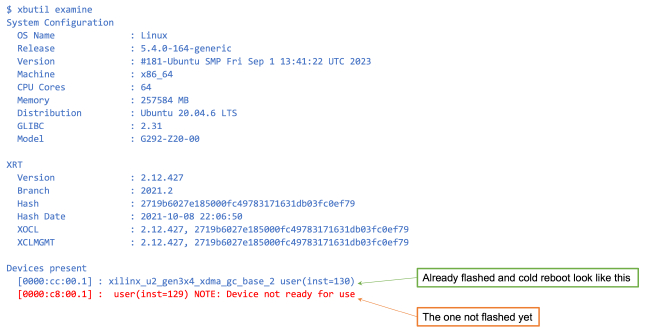
Before flash the device, it looks like this:

And you flash the device with above command

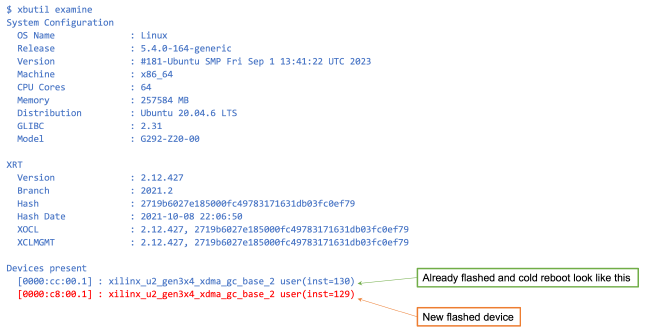
After successful flash and reboot the device, you will see

Verify installation #
Reboot and follow the steps in page 17-26 in guidline PDF. You should observe exactly same content.
You cannot run experiment on page 27, it only provide the exe version.
Format the disk #
SmartSSDs provide transparent access similar to any standard SSD. Therefore, you need to format the disk just like you would with normal SSDs.
sudo gdisk /dev/nvme1n1to create partition tablesudo mkfs.ext4 /dev/nvme1n1p1to format the partition- Addto
UUID=745d83c5-dd3c-4316-abb0-25477c9d8c28 /mnt/nvme1 ext4 defaults,nofail 0 2 UUID=93ec49d3-c7e3-4002-a2db-dccfd531525e /mnt/nvme2 ext4 defaults,nofail 0 2/etc/fstabto automatically mount the drive, then executesudo mount -ato mount the drive now. sudo setfacl -d -m u::rwx,g::rwx,o::rwx /mnt/nvme1to set the file permission so that everyone in the system can read and write drive
Vitis #
Install with graphic installer #
By default the Vitis provide graphic installer, you need to install X11 if the server does not have a desktop environment:
#CNETOS ONLY
sudo yum install xorg-x11-server-Xorg xorg-x11-xauth xorg-x11-apps
Ubuntu server comes with X11.
Vitis installer also need the following dependence:
sudo apt install libncurses5-dev libncursesw5-dev libncurses5 libtinfo5 libtinfo-dev default-jdk
Otherwise, The installer will be stuck on the last step “Generating installed device list”
Currently in our casper.bu.edu server, Vitis is installed to /opt/tools/Xilinx
After successful installation, run post installation script
yuhangs@casper:/opt/tools/Xilinx/Vitis/2021.2/scripts$ sudo bash installLibs.sh
Install with CLI #
Later, we found out that Vitis can be installed via CLI.
Generate installation config
./xsetup -b ConfigGen
After generating install_config.txt, manually modify the file Modules, set Kintex UltraScale+:1.
Then run the installer.
./xsetup \
        --agree 3rdPartyEULA,XilinxEULA \
        --batch Install \
        --config install_config.txt &&
Important step: Install the patch to address the compile issues #
Vitis has a internal bug that will cause compile failed when the system time is passed 2021. The failing log shows like this:
ERROR: '2310121128' is an invalid argument. Please specify an integer value.
while executing
"rdi::set_property core_revision 2310121128 {component component_1}"
invoked from within
"set_property core_revision $Revision $core"
Futuher details: https://support.xilinx.com/s/article/76960?language=en_US
Also if you want to run sample code provided by Xilinx(https://github.com/Xilinx/Vitis_Accel_Examples), you need to install these dependencies.
sudo apt-get install libboost-all-dev opencl-clhpp-headers
Compile and run an example #
Here we will use Xilinx’s Vitis example
https://github.com/Xilinx/Vitis_Accel_Examples/tree/main/host_xrt/p2p_simple_xrt
Two important files in this sample code:
kernel.cpp-> will be compiled as FPGA kernel, to run in the SmartSSDhost.cpp-> will run on the host to trigger the kernel
Activate the environment
source /opt/tools/Xilinx/Vitis/2021.2/settings64.sh
source /opt/xilinx/xrt/setup.sh
Build xclbin file for FPGA
make build TARGET=hw PLATFORM=xilinx_u2_gen3x4_xdma_gc_2_202110_1 -j
Build application binary file
make host PLATFORM=xilinx_u2_gen3x4_xdma_gc_2_202110_1 -j
Run it
./p2p_simple <path/to/xclbin> -f ./data/sample.txt
for example
./p2p_simple_xrt -d 1 -x ./build_dir.hw.xilinx_u2_gen3x4_xdma_gc_2_202110_1/adder.xclbin -p /mnt/nvme2/test/sample.txt
The output looks like this
$ ./p2p_simple_xrt -d 0 -x ./build_dir.hw.xilinx_u2_gen3x4_xdma_gc_2_202110_1/adder.xclbin -p /mnt/nvme2/test/sample.txt
Open the device0
Load the xclbin ./build_dir.hw.xilinx_u2_gen3x4_xdma_gc_2_202110_1/adder.xclbin

WARNING: Ignoring -f option when -p options is set. -p has high precedence over -f.
############################################################
                  Writing data to SSD
############################################################
INFO: Successfully opened NVME SSD /mnt/nvme2/test/sample.txt
synchronize input buffer data to device global memory
Execution of the kernel
Now start P2P Write from device buffers to SSD

############################################################
                  Reading data from SSD
############################################################
INFO: Successfully opened NVME SSD /mnt/nvme2/test/sample.txt
Allocate Buffer in Global Memory
Now start P2P Read from SSD to device buffers

Execution of the kernel
Get the output data from the device
TEST PASSED
If the device firmware not updated, you may see error like this. Refer to previous ‘flash the device’
$ ./p2p_simple_xrt -d 1 -x ./build_dir.hw.xilinx_u2_gen3x4_xdma_gc_2_202110_1/ad
der.xclbin -p /mnt/nvme2/test/sample.txt
Open the device1
Load the xclbin ./build_dir.hw.xilinx_u2_gen3x4_xdma_gc_2_202110_1/adder.xclbin
XRT build version: 2.12.427
Build hash: 2719b6027e185000fc49783171631db03fc0ef79
Build date: 2021-10-08 22:06:50
Git branch: 2021.2
PID: 207099
UID: 1000
[Thu Oct 12 19:39:46 2023 GMT]
HOST: casper
EXE: /home/yuhangs/code/Vitis_Accel_Examples/host_xrt/p2p_simple_xrt/p2p_simple_xrt
[XRT] ERROR: See dmesg log for details. err=-2
terminate called after throwing an instance of 'xrt_core::system_error'
  what():  failed to load xclbin: Invalid argument
Aborted